Amateur astronomy is a hobby which is becoming more and more popular. Television programmes like Stargazing Live has been a big influence, and there are now plenty of documentaries on channels like BBC4 and Sky Science. Even NASA has its own TV channel. There are dozens of astronomy forums on the internet, and thousands of websites and articles on eg Youtube.. There are hundreds of books, and 5 or 6 different monthly magazines
The growth in the availability of equipment for the amateur in the last twenty years or so has been extraordinary. Choice has expanded enormously, while prices have, in comparative terms, plummeted. Thirty years ago, a 4” refractor, or an 8” reflector, were rare and expensive items, and often the only way to acquire one was to make your own. Nowadays, excellent quality 4” refractors or 8” Newtonian reflectors can be had for under £300. There has been a matching growth in the quality of mounts and tripods. It is only in fairly recent times that go-to mounts, which use electronics to find objects in the sky, have become widely available, but again, a go-to telescope can be bought for under £500.
There has been a veritable explosion in the availability and choice of eyepieces and other equipment. For astrophotographers, there are DSLR cameras, webcams and CCD cameras galore to choose from, and the quality of images appearing on forums which are taken by “backyard” astronomers is quite breath taking.
Log into most of the big astronomy forums on the internet, like Cloudy Nights or Stargazers Lounge, and you will find many new members, all asking variations on the same basic question “I want to buy a telescope, but I am confused by the choice available. Where do I start?” The people who ask these questions are the wise ones. Those who do not ask these questions, but instead, rush out and buy the first telescope they see, are those who often end up with the telescope lying in the cupboard under the stairs.
For those considering buying a telescope, there are some basic rules
Rule number 1 – aperture is king.
The larger the mirror on your reflector, or the larger the lens on your refractor, the more you will see.
It is important to understand what a telescope is for. Most beginners, or those who know nothing about astronomy, assume that a telescope is a device used to magnify, or in other words, to make bigger, objects in the night sky, or in daylight. This is true, to a certain extent. However, it is better to think of an astronomical telescope as a device to make faint objects brighter. Think of a nice clear, dark, night sky, with plenty of stars shining. How many stars can you see? Hundreds? Maybe a thousand? Now, imagine picking up a pair of binoculars and pointing them at a random point in the night sky. How many stars can you see? A hundred? When looking through the binoculars, you are only seeing a small portion of the sky, yet the binoculars will let you see a hundred stars. How many stars would you be able to see if you could see the whole night sky at once through the binoculars? Tens of thousands?
This exercise demonstrates the fact that the binoculars will allow you to see stars which are too faint to be seen with the naked eye. A telescope does exactly the same thing, but on a bigger scale, because a telescope will allow you to see stars too faint even for the binoculars. Therefore, to repeat, the binoculars and telescope make faint objects brighter.
Rule number 2 – You will see more in a dark sky.
Light pollution is a modern menace, and the level of light pollution in modern times means that astronomy from a city or large town is not easy. Many objects can still be seen, but not at their best. Galaxies, many nebulae, and a lot of star clusters are greatly diminished, or made invisible, by light pollution, although planets and double stars tend to be ok. It is now impossible to see, for instance, the Milky Way, from most suburban areas. This is a great shame, because the sight of the summer Milky Way rising out of the constellation Sagittarius, passing through the constellation Cygnus, and on into Cassiopeia, is one of the greatest sights in nature.
So, in order to get the best from your equipment, and to get the best overall experience, you need to be prepared to travel (unless, of course, you are lucky enough to live under dark skies)
Rule number 3 – it is now quite difficult to buy an outright bad piece of equipment.
The quality of astronomical products has improved to an enormous degree. The fact is that, if a company should bring out a piece of equipment which turns out to be, in the opinion of many people, a dud, then that opinion will be round the forums in a flash, and this is usually the kiss of death for that product. So, no manufacturer wants to take that risk, and they will ensure that any products launched on to the market are of an acceptable quality. Of course, you will always get what you pay for, but astronomy does not need to be an overly expensive hobby, certainly in the beginning.
It is always a good idea to seek advice, and the local amateur astronomy society is usually the best place to start.
Things to consider when buying a telescope.
There are hundreds, possibly thousands, of articles on the internet with a title similar to this one. Everyone has their own opinion on this, although there are some common factors.
The first factor is cost. How much of a budget do you have? As well as buying a telescope, you may want to buy other stuff as well, like a good guidebook, a decent finder-scope, a red-light torch, or better eyepieces. All these need to be taken into consideration in that budget, although all can be bought at a later date.
If you are an absolute beginner, and have a tight budget, a pair of binoculars, along with a guidebook, may be a good start. Binoculars will show an amazing number of objects in the sky and are a great way to start to “learn the sky”, identifying the constellations, and the brighter objects within them. Binoculars come in a wide variety of sizes, but generally, the best size for astronomy is something around 7 x 50, 8 x 40 or10 x 50 (the first number is the magnification, the second number is the field of view)
Larger binoculars like 15 x 70 or 20 x 80 can be difficult to hold steady after a couple of minutes and may need a tripod.
All amateur astronomers carry binoculars, and they are very useful. Many objects in the sky are often best seen with binoculars, as they are so large, for instance, the Pleiades (M45, Seven Sisters) star cluster in Taurus, or the star cluster M44 in Cancer. Binoculars can be useful for star-hopping, helping to work out a route to faint objects using brighter stars. And sometimes, it is just fun to lie back and gaze at the Milky Way, or Sagittarius. Many of the Messier (M) objects can be seen with binoculars.
However, eventually most will want a telescope. As mentioned earlier, the larger the aperture, the more you will see, and the more clearly you will see it. It is generally reckoned that the minimum size for useful observing is 3” for a refractor, and 6” for a reflector. This was the recommendation of Sir Patrick Moore, and nobody knew more about telescopes than him. One important thing to consider when choosing a telescope is what might be called the “WOW!” factor. When you, or anyone else, look through your telescope, you, and they, want to be delighted and amazed at the view. There is nothing more dispiriting than putting up your new telescope, looking at something through it, and saying “Is that it?” For this reason, it would be reasonable to upgrade Sir Patrick’s recommendations to 4” for a refractor and 8” for a reflector.
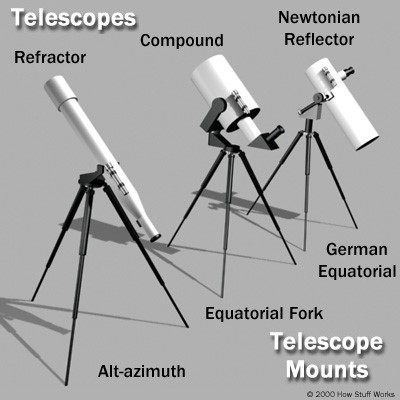
Image Credit: Craig Freudenrich, Ph.D. “How Telescopes Work” 8 November 2000.
HowStuffWorks.com. https://science.howstuffworks.com/telescope.htm
Telescopes come in two basic types, a refractor, which has a lens at one end, and a reflector, which contains two mirrors. There are two types of reflectors. One is a simple tube with a larger mirror at one end, which reflects light back up the tube from the larger mirror to a smaller secondary mirror, and the other is an compound telescope (Schmidt-Cassegrain, and variations of the SCT design), which is slightly more complicated. I will not give a detailed description here, but for an excellent description of the different types, please see this article by Andy Johnston
Each type of telescope has its strength and weaknesses. Certain telescopes are better at viewing certain objects, although all telescopes are capable of showing all types of objects. So, the second factor to consider is, what do I want to look at? If you want to view mainly planets and the moon, then a refractor may be a good choice. If you want to view deep space objects (objects beyond the solar system), then a reflector may be a better option. If you want to view a combination of both, and most people will want to do this in the end, then an SCT may be best.
Another consideration, especially for those who may be getting on a bit in years, is, can you handle the telescope? Although telescopes are, essentially, just a tube with a couple of bits of glass and filled with fresh air, the larger ones can be bulky and awkward to handle. If you buy a telescope which is too large, you may end up deciding not to go out observing because you just can’t be bothered lifting it all. If you will be travelling to a dark site to observe, you need to be sure that all your equipment will fit in your car.
Yet another factor to consider is, do you have the room to store the telescope at home? As for the previous factor, physical size can be a problem when it comes to storage. Have you the room at home to store the telescope safely? Most telescopes are not quite as fragile as they may seem at first glance, but on the other hand, they do need careful handling.
The last factor is, what type of mount do you want? Most telescopes will be sold with a mount which is deemed suitable for the type and weight of telescope. There are various different types of mount, from simple altitude/azimuth( Alt/Az) mounts, which allow the telescope to go up and down (altitude) and from left to right (azimuth), dobsonian mounts, which again allow movement up and down and from left to right and are useful for large reflectors, and more complicated German equatorial mounts (GEM). The dobsonian and GEM types of mount are available as either hand guided mounts or go-to. Go-to is useful for finding objects in the sky, and there is an on-going discussion on many websites about whether go-to mounts should be used by beginners. There is a certain amount of “old-fogeyness” involved, with many feeling that it is more important for beginners to “learn the sky” first before moving on to go-to. Others feel that go-to can be a big help from the start, as it can cut down on the frustration of trying to find small and faint objects. (This author has no particularly strong feeling one way or the other on this matter, and can see the merits of both arguments)
However, it is a fact that a go-to mount is more expensive than non-go-to for almost any given telescope. A good 8” dobsonian reflector may cost, for example, £300, but with go-to, that price can probably be doubled. Most SCT-type telescopes will be sold with go-to mounts, which is why they are, inch-for-inch, more expensive than regular reflectors.
If you eventually want to try astrophotography, a mount which can track objects in the sky accurately is essential and is actually more important than the telescope itself. This is something you need to take into consideration at an early stage.
To repeat, the best thing to do before buying any telescope is to seek advice. As a member of an astronomy society, or as a visitor, you have the perfect opportunity to do this. There is a fairly vibrant second-hand market, and most amateur astronomers take great care with their equipment. It is almost unheard of for second-hand equipment to be in bad shape. There are many experienced observers in local societies, who will be delighted to give advice, and, if they cannot answer a question, they will direct you to someone who can. They may even be able to save you a considerable amount of money!
Eyepieces
There is an old saw about an amateur astronomer whose house goes on fire. What does he save first? Well, after the family, it is his eyepiece case.

Explorer Scientific 82degree eyepieces
Eyepieces are the single most personal part of any amateur astronomer’s equipment. Ask 100 amateur astronomers to open their eyepiece case, and no two will be exactly the same. Many different astronomers may have one or more of the same telescope, or type of telescope, but, when it comes to eyepieces, they will all be different.
There are many different types of eyepieces, and many different brands of any type of eyepiece. Prices vary wildly, from tens of pounds to hundreds of pounds. They may have regular fields of view, wide-angle fields of view, or ultra-wide-angle fields of view. There are 1¼” eyepieces and 2“ eyepieces. There are fixed focal length eyepieces and zoom eyepieces. They come in all sizes, from 2.5mm to 50mm. There are, literally, hundreds, maybe even thousands, of different eyepieces to choose from.
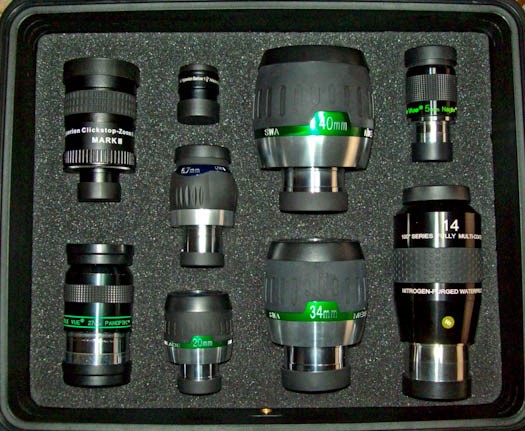
Typical eyepiece collection
The language of eyepieces is a subject in itself, with terms like field-of-view, true field-of-view, exit pupils, distortion, black-out, pin-cushion, gull-wing and all sorts of stuff which is beyond the range of this article, but, if interested, please see this article by Neil Patterson
However, there are some simple things to consider when choosing an eyepiece.
Every telescope has a focal length, and this will be printed on the telescope itself, usually on a small plate near the eyepiece holder. The focal length is the distance from the beginning of the light train to the eyepiece. SCT’s will usually have much longer focal lengths than reflectors and refractors.
The calculation of the magnification of any eyepiece can be determined by dividing the focal length of the telescope by the focal length of the eyepiece. Many telescopes, when purchased, will be supplied with one or two eyepieces, usually a 25mm and sometimes a 10mm. These will usually, although not always, be 1¼” eyepieces, usually of the plossl design, and, unfortunately, maybe not of a very good quality.
To make things simple, let us consider a telescope with a focal length of 1000mm (quite a common focal length for many telescopes)
Therefore, the 25mm eyepiece will give a magnification of 40 times (usually expressed as 40x) = 1000 divided by 25, and the 10mm eyepiece will give a magnification of 100 times (100x) = 1000 divided by 10
After using these eyepieces for a while, the beginner will maybe start to notice that there are certain objects for which he or she can never quite get a satisfactory view. Maybe the object is too small in the 25mm eyepiece, but too large in the 10mm eyepiece, or maybe the field of view is too small, or not very sharp. This is when they will start to think about getting a better view. It is not necessary to buy a better telescope. Rather, this is the time to consider new eyepieces.
The beginner, and indeed, more experienced observers, will constantly ask themselves questions as they use their eyepieces, for example, Is that object too big, or too small? Can I get a wider field of view?
These questions will determine their next move. Suppose, for instance, that they have found an object which is too small in the 25mm, but too big in the 10mm. They will want to see it at a half way point between the two. The halfway point between the two is 70x. What size of eyepiece will give approximately 70X? Using the calculation, a 13mm eyepiece will give approximately 77x, a 14mm will give around 71x, and a 15mm will give approximately 67x . Therefore, all these sizes could be considered for the new eyepiece.
Perhaps our observer is satisfied with the view of both eyepieces but would like a higher magnification. In this case, he or she might consider an 8, 7 or 6mm eyepiece. Or maybe they would like lower magnification, if they enjoy scanning along the Milky Way or big star clusters. In that case, consider a 35mm or 40mm eyepiece.
Plossl eyepieces usually come as a 50 degree field. If you would like a bigger field of view, then consider an eyepiece with a 68 degree field, or even an 82 degree field. These are obviously more expensive, but not overly so in many cases.
One simple way to, in essence, double your eyepiece collection is to buy a 2x barlow lens. This will double the magnification of any given eyepiece (you could also, if you wish, think of a barlow lens as doubling the focal length of your telescope). Therefore, to go back to our two beginner eyepieces, a barlow will turn the 25mm into a 12.5mm, giving 80x, and the 10mm into a 5mm, giving 200x. Some people do not like barlows, and prefer fixed length eyepieces, but most amateurs have one somewhere amongst their equipment. Barlows are also available in a 3x, 4x, and even a 5x format, but these are used mainly by astrophotographers.
Most amateur astronomers will eventually end up with a collection of eyepieces, anywhere between 3 and 6, which they will use regularly to cover all the things they are interested in. Some, of course, have many more than that. These will cover a range of magnifications.
For a set of three eyepieces, there will be a wide-field, lower magnification eyepiece for galaxies, large nebula and big star clusters (eg 25mm – 40mm), a medium range eyepiece for a closer view of those types of object (eg 14mm – 20mm), and a higher power eyepiece for planets and double stars (eg 6mm – 10mm). Over time, most people will go through many different eyepieces, always looking for that one particular eyepiece which does the job perfectly, and many people will take quite a while, often years, to build up the “perfect” collection.
There are some other things to consider. Many people think that high magnification is always to be desired, but this is not so. The performance of a telescope, and eyepieces, will be affected by the atmosphere. The atmosphere is in constant motion and causes distortions of the view. When describing viewing conditions, astronomers often use the terms “seeing” and “transparency”.
Seeing is a description of the calmness of the atmosphere, and the calmer it is, the better the view will be. That is why the best views of planets can often be found in slightly misty conditions. Mist will only form when the atmosphere is very steady. Planetary viewing is very susceptible to atmospheric conditions.
Transparency is a description of the clarity of the atmosphere, and this is often better in the countryside than in the city. In good transparency, deep space objects (those outside the solar system) are easier to see and resolve. Obviously, ideal conditions would be when seeing and transparency are both good. Good seeing and transparency can often be found early in the morning.
One way to think of these is to imagine lying at the bottom of a perfectly still outdoor swimming pool and looking upwards. When perfectly still, blue sky and clouds can be seen. Now imagine that someone throws a stone into the water. Ripples will spread across the surface of the water, and the view will become unsettled. This is seeing.
Now imagine that someone throws a load of sand into the water. The view will become cloudy and dirty. This is transparency.
It is rare that any night, especially in Ireland, will be good enough to allow much more than around 200 times magnification. However, even this magnification will not show many objects at their best. Stars and planets are basically pinpoint sources of light and can be magnified quite high. But an object like a galaxy, or a nebula, has its source of light spread across a larger area. When this source is magnified, this area becomes larger still, and the light is spread out even more, to such an extent that the object can often start to fade. Therefore, for this type of object, it is usually better to stay with a low or medium magnification.
Therefore, a good set of medium to low magnification eyepieces is often a better investment than two or three high power eyepieces. A set comprising of, for example, a 30mm, a 20mm and a 14mm, will get a lot more use than a 6mm and an 8mm. Everyone has at least one high power eyepiece, and a good one is a worthwhile investment. But one is often enough, and, if you have a good barlow, then the 30mm can be barlowed to give 15mm, the 20mm can be barlowed to give 10mm, and the 14mm can be barlowed to give 7mm.
Beware of eyepiece kits, as the eyepieces themselves in the kit tend to be of low quality. Many of these kits are sold with coloured filters, but these are of little use. It would be better to invest in a zoom eyepiece, which will give a range of different magnifications in one eyepiece. The main problem with these is that the field of view can be quite small, especially at lower magnifications.
As mentioned before, being a member of an astronomical society gives the beginner a big advantage. If you bring your new telescope to an observing session, most of the more experienced observers will be delighted to let you borrow their eyepieces to try them out in your telescope. Like everything else, advice is already readily available, so take the opportunity to “try before you buy” and ask as many questions as you like. The second-hand market for eyepieces is a very vibrant one, and there are bargains to be found.
Other Accessories
Finder scopes
These are small telescopes which are fitted to the main telescope and are used to find objects in the sky. The finder scope is aligned to the main telescope before observing begins. They vary from 6×30 up to 10×50. You could think of them as half a pair of binoculars. Quality varies considerably.
Red dot finders are becoming increasingly popular and nowadays are often supplied with new telescopes instead of a finder scope. They are lined up with the main telescope so that the red dot is pointing at the same object as the main telescope. This is often easier to do in daylight, using something like a distant chimney pot or pylon. The useful thing about a red dot finder is that it can be used to find objects which are not visible with the naked eye, by pointing the dot at the rough position of the desired object in the sky, using visible stars as a reference.
Telrad finders use concentric circles instead of a single dot and are very popular. The circles are 2 degrees apart and can also be used to calculate the position of objects which cannot be seen in a finder scope. There are Telrad charts available on the internet.

Telrad

Finder Scope
Chair or stool.
This is a very useful piece of equipment, and almost anything comfortable can be used. It is much easier to observe and study objects if you are sitting comfortably
Guide books and sky maps.


There are plenty to choose from, and the best for beginners is probably “Turn Left at Orion” This describes objects in the night sky and gives clear instructions on how to find them. It is also filled with good advice and tips on how to get the best from your equipment. Another favourite is “Celestial Sampler” by Sue French. This is subtitled “60 tours of the night sky for small telescopes” and is a compilation of some of her columns for Sky and Telescope magazine. Each article concentrates on a small part of the sky and describes the best objects to be found in that area. Almost all the articles contain at least one Messier object, as well as galaxies, double stars, nebulae and other interesting objects.
The best sky maps include the “Cambridge” series, especially the “Cambridge double star atlas”, and the Sky and Telescope pocket maps.
Star charts for the month are printed in all the astronomy magazines, along with suggested objects for viewing and guides to the planets.


Red torch
This is a vital piece of equipment for reading star maps and guidebooks. A white torch will ruin your night vision very quickly, and this can take up to half an hour to return after being lost, although a very small white light torch will be ok as long as you don’t shine it directly into your (or someone else’s) face. A simple bicycle rear lamp is a good choice, or you can paint a small white light torch with something like red nail varnish. Red light head torches are a useful tool to keep both hands free.
Filters
Filters are pieces of glass which can be screwed either directly into an eyepiece or into the telescope end of a diagonal on a refractor or SCT.
Coloured filters used to be very popular with planetary observers but have now gone out of fashion to a large degree. They can enhance the details of certain features on different planets, although the effect tends to be subtle.

For lunar observers, a lunar filter is a must have piece of equipment. The Moon can be very bright, especially in the few days either side of full Moon. If you look at an unfiltered bright Moon through an eyepiece for too long, you will find that, once you take your eye away from the eyepiece, there will be a large white spot in your vision, and this can take quite a while to disappear. Most lunar filters are simply a grey piece of glass, although there are polarizing filters available which will vary the amount of light they allow through.
UHC (ultra-high contrast) and O111 (Oxygen-3) filters are used to view nebulae, both large gaseous nebulae like the Orion nebula (M42) and the Veil Nebula in Cygnus, as well as planetary nebula like the Ring nebula (M57) in Lyra
These filters work by blocking out many wavelengths of light, while allowing those wavelengths prominent in the nebulae to shine through. Again, the effect can be subtle, although, with experience, they can make a considerable difference to the view. O111 filters tend to be rather specialised for certain objects, but a good UHC will work on most nebulae, and, like a barlow lens, most experienced observers will have one amongst their equipment. They are of no use for most other objects in the sky.
LPR (light pollution reduction) filters are sold by some companies as an aid to reducing the effects of light pollution. If you hold one of these up to your eye in a city, you will indeed notice that the amount of light pollution is reduced considerably, the background sky becomes black, and bright street lights become small red dots. However, in the eyepiece, as well as reducing the light pollution, they also reduce the amount of light from the object you are observing, often by as much as two full magnitudes, therefore making the object much fainter. They are sometimes used by astrophotographers but are of little use to observers.
Hopefully, this short article will provide some guidance to those starting out in the absorbing hobby of amateur astronomy. Don’t be afraid to ask questions and seek advice, most amateur astronomers enjoy talking about the hobby almost as much as they enjoy observing the sky, and are always glad to answer questions and let you try their equipment
Good luck
Stevie Beasant