Resident comet hunter and EAAS member, Martin McKenna has been observing comets since 1997 and has made it his passion in the field of astronomy. He has clocked up over 700 hours observing in 5 years and has taken some time out during cloudy nights to give us his experiences and some excellent in-depth information as to how we can search for, observe and describe comets.
For me, comets are the most amazing objects to graze the night sky and of all the objects available to the amateur astronomer to observe on a given night, comets are my favourite. They are special, they are elite! These objects offer something for everyone, from the beginning naked eye observer to the most experienced deep sky observer. They are transient objects of the very best kind. They change there brightness like variable stars – yet they are not stars, they move among the back ground stars like asteroids – yet they are not asteroids, there ghostly tails are like the aurora and can be visible to the naked eye or only with the largest telescopes. Its there unpredictable nature that allures me. At its most basic level, comet observation is fun however, with a little practice, anyone can contribute observations of scientific value. Professional telescope time is so valuable and astronomers do not have time to observe every comet, so this is an area where the amateur astronomer is invaluable. At any given time there are at least a couple of faint comets within the grasp of moderate to large backyard telescopes. If you wait a little longer one or more may become visible to small telescope users. Once every year or two a comet will become bright enough to be seen in binoculars and every 5 years one will present itself as a nice naked eye object. However on average once a decade a comet comes along that is so bright that it shakes the world of astronomy and gets attention even in television and newspapers throughout the world. These great comets are not to be missed. They can and have profoundly changed people’s lives. I am one of those people! The year was 1997 and it was a cold frosty night. The time was in the hours before dawn, I was with a friend driving through the country. Since we where just driving around I asked my friend to pull over so I could look at the stars from this extremely remote dark location. As we stepped out we were hit by the frost, it was so cold but very calm and quiet, we could have heard a pin drop. As our eyes adapted to the dark we saw more stars than we have ever seen in our lives. We glanced to the east and got a severe shock!..there high in the eastern sky was a giant search beam. We got more confused when we seen no pole or source attached to this beam. It sat there among the stars with a glorious star like head. My friend finally remembered reading in the newspaper about the arrival of a great comet called Hale – Bobb… and this was it!!! What a sight it was, the emotions I felt where similar to how the ancients felt when a great comet appeared in there sky. A combination of fear and complete and utter amazement as if I didn’t know whether to fear or admire it. I have never forgotten that ghostly white tail and it has since changed my life. I now observe every comet that comes within range of my equipment. Comets are double edged swords, they may be responsible for mass extinctions and for delivering the ingredients that led to the formation of life on earth so when you observe a comet you could actually be observing your own ancestors!
COMET NOMENCLATURE
In naming comets, there is a prescribed way of labelling so as to catalogue comets in a descriptive way e.g. 1P/1982 U1 (Halley). First we have the letter C or the letter P followed by a forward slash. C stands for a long period comet ( a period of over 200 years) and P stands for a short period comet ( period of less than 200 years) more rarely the letters D and X where D stands for comets that have disappeared and X for those whose orbits cannot be computed due to a lack of observations. Next comes the year of discovery then a space followed by a letter. The letter indicates the half month of the discovery. The letters from A to Y are used however the letters I and Z are omitted. Next is the number which indicates the order of discovery during that half month period. Lastly we have the name of the discoverers. Up to 3 names can be included. These are the first 3 to report the new comet before it is officially announced. An example comet designation is the recent C/2004 Q2 Machholz.
COMET MAGNITUDE VERSUS APERTURE
It is important to note here that comets are generally fainter objects to observe compared to other deep sky objects of similar magnitude. If your telescope can detect a galaxy at mag 14 then you maybe surprised to learn that a mag 14 comet will be out of your scopes reach. This is because comets are diffuse objects with soft edges that can blend in very well with the back ground sky. Also, even a bright comet may succeed in slipping by you. Comet observer David Levy recalls missing a 7th mag comet with his 16” reflector. This was because the comet was a large very spread out object and hence had a very low surface brightness so watch out for these kinds of interlopers. Below is a list showing aperture versus comet magnitudes …..
| Aperture (mm) | Faintest Magnitude |
|---|---|
|
50 |
8.0 |
|
80 |
9.5 |
|
150 |
11 |
|
200 |
12 |
|
300 |
13.5 |
|
400 |
14.5 |
LOCATION LOCATION
Your location is an important factor and will greatly influence the number of comets you can observe. The ideal location is a very dark rural site away from any light pollution and with a panoramic view down to the horizon. Even very bright comets maybe difficult if they are close to the Sun as they never get high in the sky and lurk within the bright evening or morning twilight skirting the horizon. A transparent sky is important, more important than having good seeing conditions. Stars to magnitude 6.0 should be visible with the naked eye and cometary observations should only be undertaken in a dark, moonless, clean sky. Observers should compliment there telescopic observations with binocular and naked eye work. Not everyone has the perfect location but we have to make do with the best we got, simple techniques like good dark adaption, patience, averted vision go a long way. Some deep sky observers place a light shroud over their head and eyepiece to cancel out stray light. The famous visual observer Stephen James O’ Meara uses a method of deep breathing to oxygenate the brain and therefore enhance visual acuity resulting in a gain of 1 magnitude. Tapping the telescope tube works well too as the human eye is better at detecting moving objects rather than stationary ones.
FINDING THE COMET
Ok, so you plan to set your telescope up when it gets dark but how do you know if there are any comets visible from your location? This is where the internet comes in handy. I advice visiting the following websites………
http://www.ast.cam.ac.uk/~jds/
http://www.aerith.net/comet/weekly/current.html
These sites will tell you which comets are visible from your location. After you have chosen your comet of interest eg: (Q2 Machholz) then click on its ‘Ephemerides’.
This is a table which includes information of the comets RA and DEC, its predicted magnitude, current elongation from the Moon and Sun for every night during each month of its apparition. Then it’s a simple matter of plotting the comets position on a good star atlas like ‘Sky Atlas 2000 or Uranometria (the latter is favoured by comet observers). If you plot its position for several nights (preferably 5) then you will get a good mental picture of its speed and direction of movement during that time. If the comet is at a respectable distance (elongation) from the Sun and is above the horizon then you can begin to track it down. I prefer to point the telescope at the section of the constellation the comets located then complete a little systematic search using a low magnification wide field eyepiece. Others may be more comfortable with the traditional technique of star hopping yet others will be inclined to use a Go–To telescope which is absolutely fine if you are having difficulty or are rushed for time. I personally encourage the manual approach for 2 reasons…
1)When you do find the comet you will get an unmistakable thrill as you have successfully tracked it down yourself and the process in itself is very satisfying and will teach you the sky in a way you will never forget.
2) You never know what you might find along the way (this applies to all types of observing), amateurs have found new comets and novae before while tracking down other objects. Eg: Of recent times Vance Petriew discovered Comet Q2 Petriew while star hopping to the grab nebula (Messier 1 in Taurus). However you are more likely to accidentally find a new galaxy or binary star you have never seen before enriching your observing experience.
If the comet is brighter than magnitude 8.0 it may already be visible in your finder scope but if not scan the eyepiece field for a faint fuzzy patch of light…that is your comet. Its important to remember that the ephemerides maybe inaccurate for a newly discovered comet if there has been a lack of accurate astrometric positions to nail down its orbit and as such your target maybe a little away from its predicted position so it pays to sweep around a little. Even well known periodic comets have been known to drift from there locations due to non – gravitational forces so bare this in mind.
DEGREE OF CONDENSATION
Comet observation is split up into 2 main areas. Those concerned with the ‘Coma’ and those concerned with the tail/s respectively. Now I will concentrate on the coma.
The ‘degree of condensation’ or DC for short is a way of gauging how condensed the coma is. In a more specific manner it provides a visual description of the coma intensity across distance. It runs on a scale from 0 to 9…
0 = Diffuse coma of uniform brightness
1 = Diffuse coma with slight brightening towards centre
2 = Diffuse coma with definite brightening towards centre
3 = Centre of coma much brighter than edges, though still diffuse
4 = Diffuse condensation at centre of coma
5 = Condensation appears as a diffuse spot at centre of coma – described as moderately condensed.
6 = Condensation appears as a bright diffuse spot at centre of coma
7 = Condensation appears like a star that cannot be focused – described as strongly condensed
8 = Coma virtually invisible
9 = Stellar or disk like in appearance.
If your value is between two values say 3 and 4 then it is recorded as 3/
Do not confuse the central condensation with the degree of condensation. This is where confusion arises to beginning comet observers. A central condensation is a distinct brightening or disk within the coma. A condensed comet need not have a central condensation. One example is A2 LINEAR which went into outburst in the winter. The coma was a featureless patch of light, completely uniform in brightness with absolutely no CC. An inexperienced observer would rate this as DC0 however it actually had a DC of 9 because the comas edge was completely sharp like a planetary disk. Confused?…dont worry, with practice you will get better estimates. The best thing to do is to just try it yourself and compare your results to those of other observers on the above web sites. Eventually it will become second nature.
Below are 3 sketches. Top is an example of a moderately diffuse comet (OG108 LONEOS) middle is a moderately condensed comet (C/2002 C1 Ikeya – Zhang) and bottom is a very condensed comet (V1 NEAT).


Other things to record are….
What shape is the coma? Is it circular, elliptical, parabolic, elongated? Elongation could be an indication of comet break up as happened to C/1999 S4 LINEAR in the summer of 2000.
Is the CC placed at the centre of the coma? A closer inspection may reveal it is not symmetrically placed but rather off centre.
What colour is the coma? Most faint comae are a pastel grey colour while others are an obvious blue or green. Some brighter comets near Perihelion have displayed gold colours.
THE FALSE NUCLEUS
Is there a false nucleus? Not to be confused with the CC. The false nucleus is a star like body deep within the coma or CC. This is known as the false nucleus because the true nucleus is hidden from view by sunlight reflecting off dust particles issuing from the true nucleus which obscures our view. There are no confirmed observations of the true nucleus either visually or with super sensitive CCD devices although there have been claims in the past that have not been confirmed. Some comets have a false nucleus and some don’t. Take note of its position within the coma, its colour and brightness. Magnitude estimates of the false nucleus are valuable and are known as M2 magnitude estimates (you will most likely need a CCD imager for this) where M1 refers to the total magnitude of the coma.
COMA DIAMETER MEASUREMENTS
A simple way to measure the diameter of the coma is by knowing the field of view of each eyepiece. This technique is not very accurate but it is simple and is a good place to start. Eg: using my 32mm SWA eyepiece in conjunction with my 16” F/4.5 reflector I know the FOV is 1 degree or 2 full moon/sun diameters (I have obtained this value at an earlier period) which is 60’. If the coma of a comet takes up ¼ of the FOV then I can estimate that the comet has a coma diameter of 15’.
Another more taxing method is to measure the coma diameter by estimating its length in relation to nearby field stars then using a detailed star atlas to work out its size.
The third method is the ‘drift method’ and it is the one I use for my own estimates. Simply time how long it takes for the coma to drift out of the FOV along the east – west line, if you have a motor drive on then switch it off. Stars will disappear out of the FOV to the west and new stars will drift in from the east. Using the following equation the coma size can be estimated with good accuracy…
D = 15t cos delta where D is the east = west time span
INTERESTING FEATURES TO LOOK OUT FOR
There are other more intricate details hidden within the coma that may not be obvious at a first glance however by being aware and familiar with them in advance you may pick them out especially on an active or bright comet. These include…
Envelopes or hoods which are often seen concentrically placed around the central condensation.
Fans are sectors of material emanating from the central condensation
Jets are radial features projecting from the CC either as straight lines or curved and are most prominent in active or very close/large comets. Hale – Bopp is a classic example however several observers spotted these in the recent Q2 Machholz. (See Sketch)


Spines are bright, sharp, narrow streaks leading from the CC into the tail.
Rays Delicate strips of light coming from the CC usually a soft white/grey or blue colour.
Shadow of The Nucleus Not really a shadow as such but looks that way visually. According to the BAA observing guide to comets it is rare and needs a 16” or larger instrument to be seen easily
Fountains Around 1’ high in the sunward direction. They are diffuse features subtending a few to 100 degrees angle and are more common than jets.
MAGNTIUDE ESTIMATES
This is an area where the amateur observer can contribute important data of scientific value. If you have experience in the field of variable star observation then comet magnitude estimates should present no problem however to a beginner this area of comet photometry can seem daunting and complicated but with a little practise you can obtain data of scientific value in no time. There are various methods employed eg: the in – out method, out – out method, modified out method and the Beyer or extrafocal Extinction method. For the purpose of this article I will choose one…
THE IN – OUT METHOD ( OR SIDGWICK)
1) Study the coma until you are familiar with its average brightness. This is easy if the entire coma is uniform (has a low degree of condensation or DC) but not so easy if the coma sports a highly developed CC.
2) Using an atlas that shows star magnitudes, find a comparison star at about the same altitude and, if possible, in the same part of the sky as the comet.
3) Throw the star out of focus so that it is the size of the in – focus coma.
4) Compare the stars out of focus brightness with that of the in – focus coma.
5) Repeat steps 2, 3 and 4 with more stars, until you have a star less than half a magnitude brighter than the coma and a second one less than half a magnitude fainter than the coma.
6) Interpolate between the 2 stars to assign the coma its magnitude.
Do not be intimated by this and gave it a go. With constant practice you will become very proficient and will have developed a very useful observing skill that can be used throughout your own observing lifetime.
Things to remember – because of the little understood phenomena of ‘aperture affect’ one should use the smallest optical aid needed to see the comet in order to obtain an accurate magnitude estimate. Example: a 16” telescope should NOT be used to make an estimate of a mag 8.0 comet! Instead a good pair of binoculars would be a more efficient tool and would be more user friendly for this work because of there larger fields and the ability to through stars out of focus quickly with a touch with your finger or thumb. Many enthusiastic comet observers have in there possession a full range of equipment from binoculars to medium and large aperture telescopes. Consider a very bright naked eye comet like Hyakutake, binoculars would give an untrustworthy magnitude estimate, you can see the coma with your naked eye but how can you defocus your eyes to make your own estimate? Surely the suggestion sounds ridiculous? Well there is one way that is not well known among observers, a neat trick that is as yet unnamed. Imagine standing under a clear starry night with a bright comet in front of you. Hold your finger or thumb out in front of you. If you lift your gaze from the background stars onto your thumb you will make the stars become out of focus. By shifting the distance between your eyes and your thumb you can adjust how far out of focus you want the stars to be. With a little concentration you can find bright naked eye comparison stars and interpolate between then as mentioned above to make your own magnitude estimate – simple but it works!
Try to find suitable comparison stars that are placed nearby and at the same altitude as the comet. Choosing one star at the zenith and a second near the horizon is not good practise and should only be used if no other choice is available. More advanced observers apply an equation which corrects for atmospheric extinction when a comet is placed low in the sky close to the horizon which cancels out and corrects the effects of the comparison stars low altitude in thick atmosphere kind, I like to this as a funny kind of adaptive optics with a calculator. As a last pointer avoid using red comparison stars which have a tendency to build up on the retina and appear brighter than they truly are. These chameleon stars produce what is called the ‘purkinjie affect on an observer and as such should be avoided.
Finally NEVER be influenced by other observers magnitude estimates, do not be tempted to edit your own estimate because other observers have results that differ from yours. After all you might have the only correct one and second the magnitudes produced on the ephemerides are the predicted magnitudes. More often than not these are not accurate so your own estimates maybe imperative if few observers have been following your chosen comet. If you stick to lease guide lines then you will be producing high quality magnitude estimates in no time!
A TALE OF 3 TAILS
The tail is the most distinctive feature that comes to mind when you mention the word ‘comet’ to anyone. Comets have 2 distinctive types of tails…
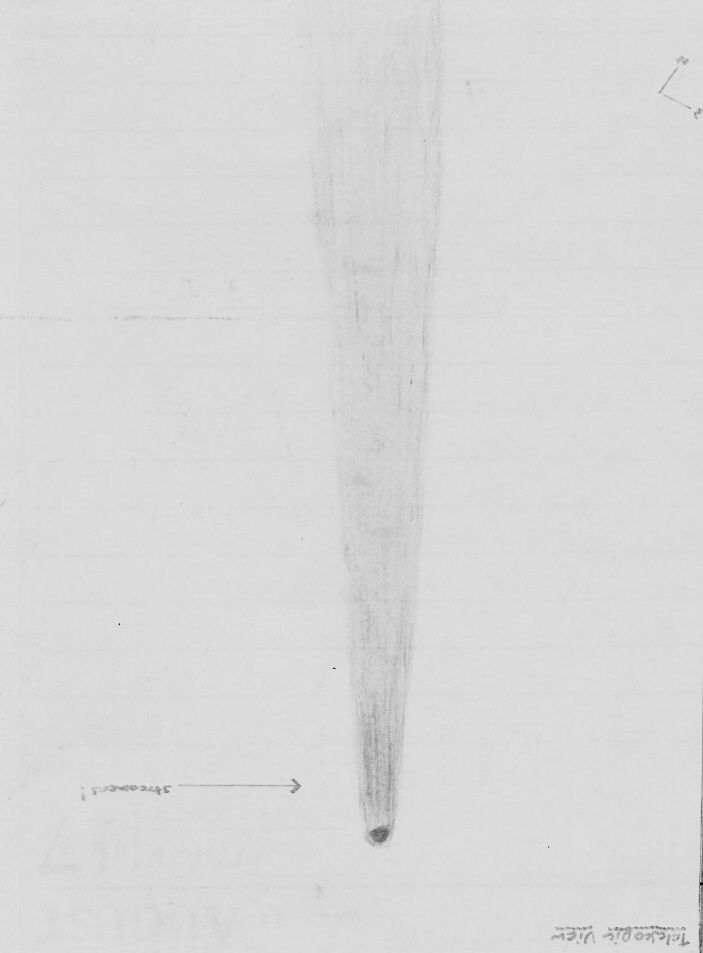
TYPE II DUST TAILS
The most prolific type of tail to many visual observers. Type II dust tails are normally the brightest type of tail to observe. They are composed of dust particles that reflect sunlight and can appear curved as each individual dust particle follows its own leisurely orbit around the sun in the wake of its parent nucleus. Dust tails can vary from faint to very bright depending on how active and dusty a comet is and its elongation from the sun and its perihelic distance. They often appear a grey pastel colour like the coma or a bright white or even a lovely yellow/gold caused by the reflection of sunlight. Through binoculars and telescopes they are typically uniform in brightness and texture however very active or ‘great’ comets may exhibit what is known as ‘synchronic bands’. These are bright sections of bands within the dust tail that are caused by episodic outburst of active jets of dust from the rotating nucleus that can look spectacular to anyone who has been privileged enough to witness such a scene. Great comets Hale – Bopp (1997) and West (1976) are classic examples. (Below is a sketch of the dust tail on S4 LINEAR)

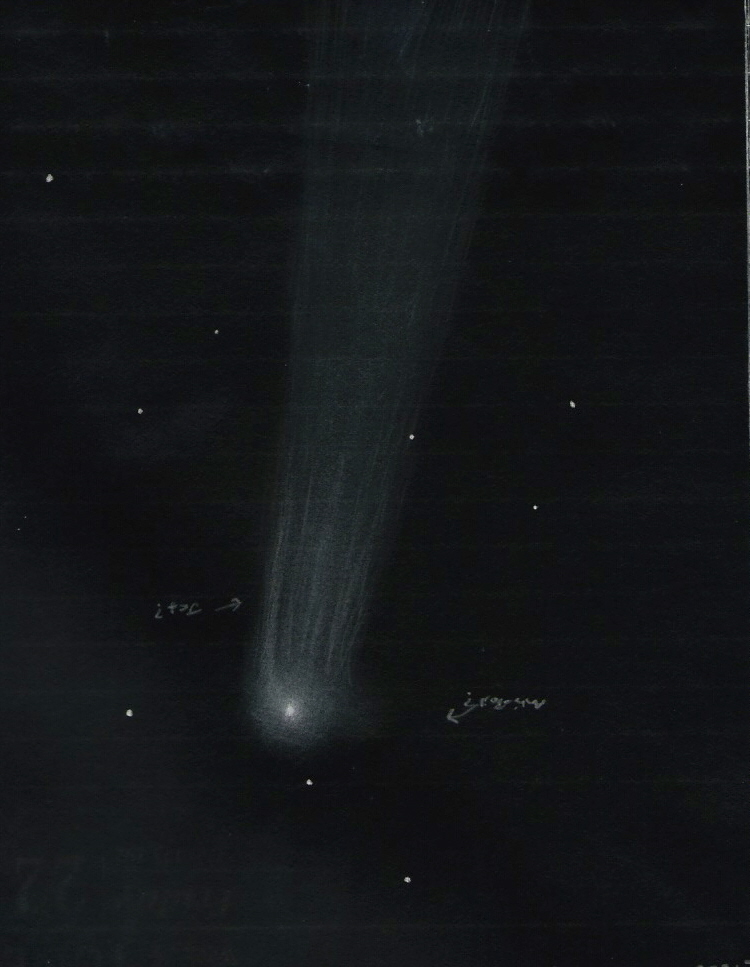
TYPE I ION TAILS
Type 1 ion tails are also known as gas or plasma tails. These types of tails are much more elusive and subtle than there dusty counter parts. They always are straight and point directly away from the sun and exhibit a beautiful electric blue colour.

(The sketch above shows the complex ion tail of Q2 Machholz)
Observing this type of tail requires a very transparent dark sky; they are seldom seen with the naked eye and are best observed visually through binoculars or a telescope. They are very dynamic and can change dramatically in a short period of time often displaying some very intricate details like….
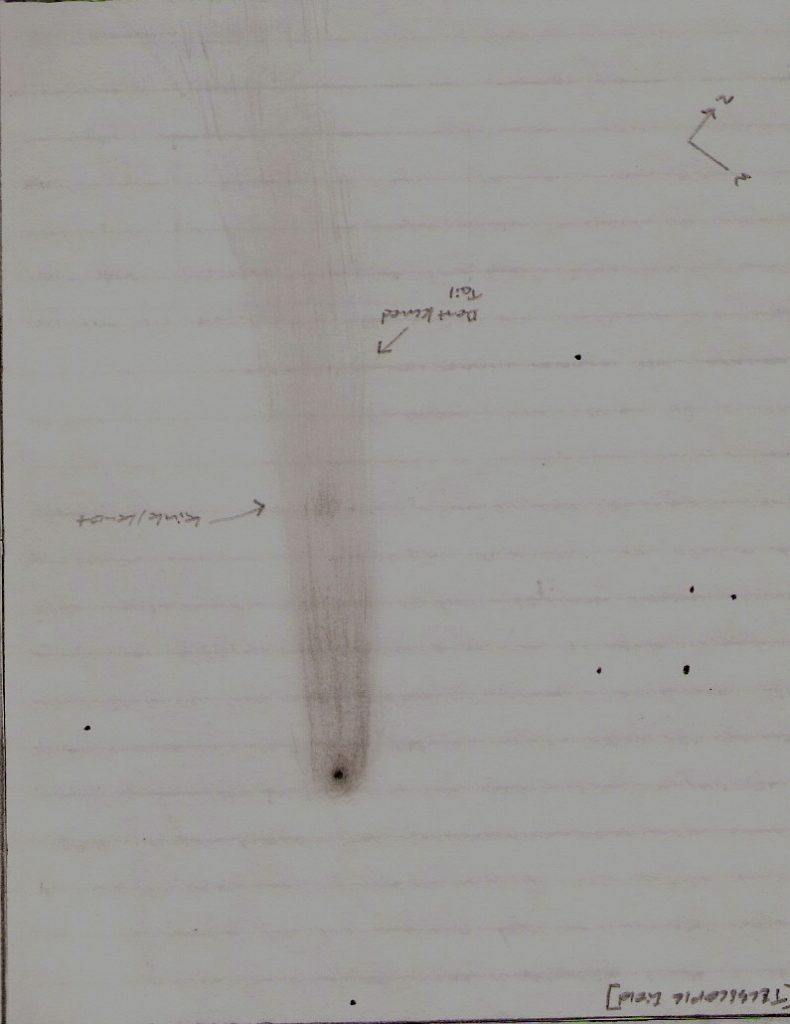
KINKS = Bends or twists that can be seen to move down wind through the tail by the solar wind over a period of several hours however these are best seen on photographs and CCD Images
STREAMERS = Delicate thin blue lines of gossamer that emanate from the coma running straight down the gas tail, they can be numerous, very long and be seen superimposed on the dust tail. They are truly a lovely sight and best seen in binoculars. You could almost swear you could see them dancing in real time in the solar wind. (Below is a sketch of streamers in Ikeya – Zhang)
KNOTS = If you are vigilant enough you may catch a glimpse of a dark patch or knot of material move down wind through the tail. Believe me you will know such an event if it appears as it clearly stands out. The only time I have seen this happen was while observing comet Ikeya – Zhang in 2002 with my 8” SCT at 49X , I was very surprised and excited to say the least! (See sketch below)
DISCONNECTION EVENTS = These are best seen with a succession of CCD images but are very rare to see visually unless you are vigilant and an experienced observer with excellent sky conditions. DE’s are caused by a change in direction of the solar wind. Ion tails are like weather vanes in the solar system showing astronomers the secrets of the solar winds clandestine behaviour!
ANTI – TAILS!
These have got to be one of the finest elusive sights in nature. The anti – tail or ‘anti – solar’ tail is a trick of perspective which happens when the earth passes through the plane of the comets orbit and the earth based observer is witnessing sunlight reflecting of sunlit particles that appear to extent in front of the coma pointing towards the sun instead of away from it. The most famous example of this was the spectacular ant –tail on the bright comet Arend – Roland. In 2004 I was lucky enough to see my very first and to date only anti –tail on a comet. I was observing the unexpected spectacular comet F4 BRADFIELD in the morning sky when all of sudden I spotted a lovely long 5’ long spike of ghostly light extending out from the coma in the sunward direction. I was utterly amazed because on the previous morning it was not there! As it turned out I was the only person from Ireland to see it and I learned via the MPML that only a handful of other observers throughout the world seen it also and confirmed it on CCD images. I will not forget that morning! (Below is the anti –tail on F4 BRADFIELD that morning)

WHAT TO WATCH OUT FOR
Watching a comet move among the background stars can be a very pleasing experience. It helps to have one or more field stars near the coma which will help you detect movement more easily compared to a field with a sparse number of stars. The time it takes to detect comet motion can vary widely depending on the comets distance from the sun or earth. Hale – Bopp was a very large active comet but it did not pass anywhere near the earth and so its movement was not as impressive as comets that grazed the earth so to speak like comets Hyakutake and Iras – Araki – Alcock. The latter comet is on record for making the second closest approach from any known comet. Comet Lexell currently holds the record. These 3 comets could be seen moving rapidly even with the naked eye and made astrophotography very difficult as imagers had to guide accurately on the fast moving nuclear region in real time during a time exposure!
Comets in pro grade motion move in the same direction as the earth similar to asteroids at speeds in excess of 40km/sec however (asteroids have slower velocities) many long period comets move in a retrograde motion against the motion of the earth around the sun and can generate speeds of up to 72km/sec…that’s 72 times faster than a bullet fired from a high velocity rifle! Keeping this in mind really brings to life any comet motion you detect. During a winter EAAS observing night a number of us watched comet Q2 Machholz move in near real time within the telescopic FOV when the comet was at perihelion. Another thing to watch out for is comets transiting across field stars. I fondly remember S4 LINEAR moving swiftly across field stars one bright summer’s night. I could actually see the stars dim in real time as the comets wedge shaped dust tail passed in front of them. What a sight!
TAIL LENGTH MEASUREMENTS
Comet tail lengths are defined in degrees and minutes of arc just like the coma diameter measurements. For naked eye and binocular tails you can estimate its length using a good star atlas and by how far the tail extends in relation to naked eye stars. It pays to be careful. Some fan shaped naked eye tails appear to ‘cut off’ at some distance from the coma while others may become faint and diffuse as they blend into the sky background. With a dark transparent sky and proper dark adaption you may be surprised to detect the tail extending much further than previously thought although sky conditions and the observers visual acuity come into play. I fondly remember seeing a blue ion tail 5* long with the naked eye on comet Machholz with a gibbous moon in the sky. It was sky transparency and patience that enabled me to detect it. At the end of the day (or night should I say) it will depend on your own observing location. Basic sky watching techniques can be used for quick estimates on a naked eye comet. If you extend your arm in front you then you can determine your own angular measurements in degrees without any optical aid….
1) Your little finger equates to 1*
2) Your thumb covers approx 2*
3) Three fingers at arms length equals 5* of angular diameter
4) A fist expands 10* of sky
5) Your thumb and little finger will extend to 20*
As mentioned earlier, do not be tempted to alter your estimates if they do not compare favourably with those from other observers. Unbiased observations are important in any area of science. For more accurate tail measurements use the same techniques that apply for the coma diameter like the ‘drift method’ etc. faint comets may possess very faint tails that will require a high magnification/wide field eyepiece to enlarge the image and induce a darker back ground sky. Tapping the telescope tube may reveal a faint extension from the coma or if there is a notable breeze then nature will do this for you. Pay close attention to what the tail tells you about itself. Is it straight or curved? Does it have soft or sharp edges? how many tails can you see? There maybe 2 tails visible at the same time, one of gas and one of dust, determine there angle of separation and note details of both. You may get one tail superimposed on the other, the ion tail is placed in front of the dust tail our vice versa however it will depend on the sun – earth – comet geometry at that period of time Watching a tail grow can be an exhilarating experience, that tiny faint streak will change its morphology and position angle (see next section) as it approaches and rounds the sun constantly changing with our earthly viewpoint. Comet tails are typically at there longest during the post perihelion period and the change can happen fast! When Hyakutake was discovered in 1996 it looked like a featureless patch of light. Within a matter of weeks it sported a spectacular ion tail 110* long with the naked. Can you imagine that? A tail 220 moon diameters long! That’s the excitement of comet observation, they are transient, unpredictable, rogue swords in the sky and no one can tell you in advance just what they will do!
TAIL POSITION ANGLES
The position angle or PA is the terminology used to describe the angle at which the tail or tails leave the coma in relation to the set compass positions within the FOV.
The PA begins with 0* for north increasing through 090* for the east then onto 180* for south, 270* for west and finally to 0* (360*) once again. It is simple and requires no fancy equipment. Use the drift method to obtain the east – west line as accurately as you possible can, with this done and with the scopes inverted image (many scopes have south as up) I can get started very quickly. For the sake of simplicity lets say the east – west line is horizontal and level in the FOV, if the tail points straight down then I know it is pointing to the north at PA 0* if the tail is to the right (new stars enter the FOV from the east) then I know it is pointing to the east at PA 090*. By refining it with trial and error you will get more accurate results. If you sketch the tail in relation to nearby stars and use a detailed star atlas then you can work out the PA from it to. An illuminated reticle eyepiece can prove very useful here. Note that for highly curved dust tails the PA would need to be noted at various points along the curve.
CONCLUSION
I hope this article has been of help to anyone who is interested in taking up comet observation either as a fun past time or for serious observation. I have outlined much of the basic and intermediate type of work an amateur astronomer can do and I hope it will give you a taste of what comet observation has in store. The information I have supplied is just the tip of the iceberg an amateur can do to contribute quality observations to enhance our knowledge on comets as a whole. It has been a joy for me to write it and even more of a joy for me to observe these incredible, beautiful wanderers of the night sky and I look forward to many more! I will leave you with these words from Leslie Peltier…
“Time has not lessened the age old allure of the comets. In some ways their mystery has only deepened with the years. At each return, a comet brings with it the questions which were asked before, and as it rounds the sun and backs away toward the long, slow night of its aphelion, it leaves behind with us those same questions, still unanswered. To hunt a speck of moving haze may seem a strange pursuit, but even though we fail, the search is still rewarding for in no better way can we come face to face, night after night, with such a wealth of riches as old Croesus never dreamed off.”
Martin McKenna